Alta Via
1
~120 km point-to-point Lago di Braies to Belluno, typically 8–10 walking days.
Classification
Very Hard
Duration
10 days
Route distance
120.0km
Vertical Gain
+7,300m
Max Altitude
2,752m
Mission Brief
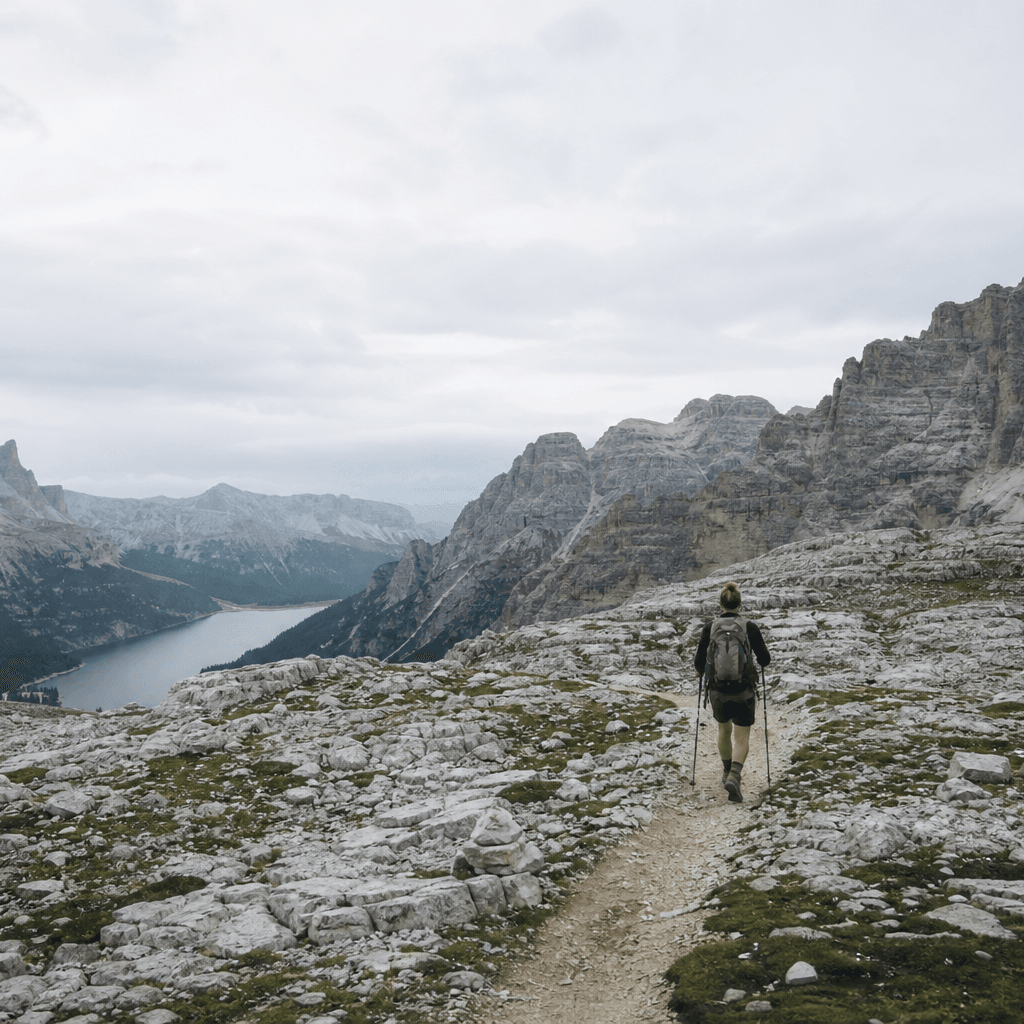
The Alta Via 1 is the mainstream Dolomites hut traverse: ~120 km from Lago di Braies to Belluno through Fanes–Sennes, Lagazuoi, and the Civetta sector on established Class 2 mountain paths—no via ferrata kit on the standard line.
Cumulative gain (~7,300 m) and afternoon storm exposure on high plateaus define the effort more than technical climbing.
The standard Dolomites hut traverse—120 km of karst plateaus and rifugi without via ferrata kit on the main Alta Via 1 line.
Mission Snapshot
Intensity Breakdown
Understanding what drives the overall route demand
Physical
75
Technical
32
Commitment
50
Primary driver: Physical load
- Sustained Physical Output
- Significant Vertical Gain
- Multi-day Endurance Load
Advanced multi-day effort: heavy fatigue, logistics, or movement friction—not necessarily alpine exposure.
Full Route Breakdown
Complete stage overview with transparent route metrics. Values are shown as recorded in the route dataset and source links.
Distance
120.0 km
Ascent
7,300 m
Highest point
2,752 m
Start
Lago di Braies to Fanes
Finish
Civetta and Moiazza
Use the KM / MI toggle in the main menu to switch units.
Route Profile
Fixed backcountry campground structure for this route
Operational Reality
Itinerary phases cover ~120 km over 10 dossier days; exact rifugio-to-rifugio km varies by chosen variants. Not survey-grade GPS.
Route Considerations
Afternoon lightning on high plateaus and slippery limestone when wet—not sustained exposure scrambling on the standard line.
Afternoon thunderstorms
The Dolomites are famous for sudden, sustained afternoon thunderstorms that bring lightning risk on the high plateaus.
Impact
Route-specific
Likelihood
Context-dependent
Tip
Start daily stages at dawn; aim to reach your destination rifugio by 2 PM. If you hear thunder, descend from the high ridges immediately.
Unstable karst terrain
Descent from Lagazuoi to Passo Falzarego involves steep limestone gravel and rocky steps that can be slippery.
Impact
Route-specific
Likelihood
Context-dependent
Tip
Utilize trekking poles for joint stability and traction. Slow your pace during the steep descent from the Forcella Lagazuoi.
Terrain & conditions
Conditions change quickly on the ground. Slow down on wet rock and pay more attention where paths narrow or exposure increases.
Impact
Moderate
Likelihood
Variable
Tip
Refer to stage notes and expert briefings; maintain focus on slick or exposed sections.
Why hike this route?
LANDSCAPE
The sunset (Enrosadira) over the Civetta wall—a world-class geological phenomenon.
VARIETY
The contrast between the white karst Sennes plateau and the lush meadows of the Civetta region.
CULTURE & PLACE
Sampling the unique Ladin and Venetian culinary blends like Canederli and Polenta at high-altitude rifugi.
WHY GO
The standard Dolomites hut traverse—120 km of karst plateaus and rifugi without via ferrata kit on the main Alta Via 1 line.
Expert Verdict
“The Alta Via 1 is a Class 2/3 alpine traverse that offers maximum scenic reward for moderate technical effort compared to the more exposed AV2. Its primary intensity stems from the cumulative altitude gain and rocky nature of the karst surfaces. Our intensity model accounts for its high elevation density—the 'Elevation Density Bonus' is fully engaged here due to the gain per km (60.8 m/km), placing the route in our very-hard band. Success is determined by early starts to avoid the peak afternoon storm window. The WWI tunnels at Lagazuoi provide an iconic alternative descent but require a headlamp.”
Who This Is For
- INTERMEDIATE — Comfortable with mountain topography and multi-day hiking. Fit enough for 6-8 hour days with 1,000m of gain.
- PHYSICAL — High. The 7,300m gain over 10 days requires good endurance, though light packs (hut bedding included) mitigate the load.
- WATCH FOR — Descending too fast from Rifugio Lagazuoi; the scree can be taxing on unconditioned knees.
- WATCH FOR — Underestimating the peak-lightning window between 1 PM and 4 PM on high ridges.
Plan This Hike
Key things to arrange before starting this route—practical tips first, then buttons that open curated picks (gear, maps, stays) where we list them.
Essential Gear
Recommended preparation for this route:
Hut trek—light pack, poles, storm layer.
- Trekking poles essential for limestone descents
- Light shell for afternoon storms; sleep liner for rifugi
- 2–3 L water capacity—karst plateaus have sparse springs
Stay Connected
Explore accommodation options for this trail:
Patchy signal in basins—offline maps required.
- Download Dolomites offline maps before Lago di Braies
- EU emergency 112; share rifugio reservation PDF
- Check MeteoAltoAdige/ARPAV forecasts each afternoon
Getting There
Travel and trail access for this route:
Train to Villabassa/Niederdorf, bus to Braies start.
- Venice/Treviso airports → Dolomiti bus networks
- Finish at Belluno with rail to Venice
- Book rifugi 6+ months ahead for peak July–August
Where to Stay
Explore accommodation options for this trail:
Rifugi with half-board—booking is the bottleneck.
- Reserve full stage sequence before flying
- Carry cash/cards for hut meals and local taxes
- Sleeping bag liner often compulsory
Compare This Route
See how this route compares to similar hikes in overall demand and terrain profile.Compare routes by the shape of the effort, not only the headline score.
Alpe Adria Trail
Closest overall match in demand profile
The Alpe-Adria Trail is an epic long-distance hiking route connecting the f...
Intensity
Slightly lower intensityMount Liamuiga
Lower overall intensity, similar terrain type
The Giant of St. Kitts. Mount Liamuiga (1,156m) is a massive stratovolcano ...
Intensity
Lower intensityOrdesa — Cola de Caballo to Refugio de Góriz
Higher physical or technical demand
Ordesa y Monte Perdido is the crown jewel of the Spanish Pyrenees. This ico...
Intensity
Higher intensityExplore Alternatives
Broaden the picture with easier, harder, and nearby options.
Looking for something easier?
Lower intensity — helpful if this route feels like a stretch right now.
Want more challenge?
Higher intensity — for when you are ready for a bigger physical or technical step.
More hikes in this region
Nearby and regionally relevant routes for the next step in your search.
Anello del Rinascimento
Tuscany (Florence) · italy
Distance
178.0 km
Ascent
4,500 m
Corno Grande
Abruzzo (Apennine Mountains) · italy
Distance
10.0 km
Ascent
780 m
Selvaggio Blu
Sardinia (Gulf of Orosei) · italy
Distance
40.0 km
Ascent
4,000 m
The Sella-Herbetet Traverse
Aosta Valley (Gran Paradiso National Park) · italy
Distance
22.0 km
Ascent
1,150 m
Via Ferrata Bocchette Centrali
brenta-dolomites · italy
Distance
18.0 km
Ascent
1,100 m
Mount Etna Summit Craters
Sicily · italy
Distance
10.0 km
Ascent
500 m
Compare with any route
Pick any hike worldwide and open a full side-by-side comparison.
What You Need to Know
Essential answers about the demands, risks, and logistics of this route.
Q.How hard is this hike really?
Q.Do I need technical gear?
Q.Is water available on the route?
Q.What is the main risk?
Ready to hike Alta Via 1?
A final decision point after reviewing the route, risks, logistics, and alternatives.
This route is a strong match if you're comfortable with the effort level implied by an Intensity Score around 68/100 (Very Hard), sustained hiking where this route requires it, and the terrain and exposure described in this guide.
Build your itinerary, stages, and logistics.
Looking for something easier, more challenging, or a different terrain profile?
Compare routes by intensity, terrain, and region.
Data: official trail documentation and topographic sources · About